Essential Supplies for Baseball Cap Drawing
To begin your journey in mastering baseball cap drawing, having the right tools is crucial. Start with a selection of pencils. These should include HB pencils for rough sketching and 2B-6B for darker lines and shading. A high-quality eraser is essential for correcting mistakes and refining your drawings. Use a kneadable eraser for precision and a standard eraser for larger areas. A sharpener ensures your pencils are always ready to produce clean, precise lines.
Invest in a sketchbook with heavy-weight paper that can handle erasing and shading without tearing. Use a ruler for straight edges, which is necessary when you’re drawing the brim of the cap. For more advanced artists, fineline pens and markers add definition and depth to your drawings. You may also consider a set of blending stumps for smooth shading and a white gel pen for sharp highlights. Lastly, keep reference images of baseball caps handy to study their structure and details.
Remember, the quality of your supplies can significantly affect the outcome of your baseball cap drawing. Take the time to gather these essentials, and you’ll be well-equipped to tackle any cap drawing challenge that comes your way.

Understanding Cap Proportions and Perspectives
When tackling baseball cap drawing, grasping the proportions and perspectives is key to realism. These two aspects ensure your cap looks believable from any angle. Here’s how to master them.
Getting the Proportions Right
Start by drawing an oval for the crown of the cap. The oval’s width should be slightly wider than its height. Draw a rectangle for the brim, ensuring it’s proportional to the crown’s size. Typically, the brim’s width matches the crown’s width. Remember, the back of the cap narrows slightly.
Use reference images to keep your proportions consistent. Observe how the cap’s panels come together, and where the seams and stitching are. Roughly sketch these elements and refine as you progress.
Mastering Perspectives
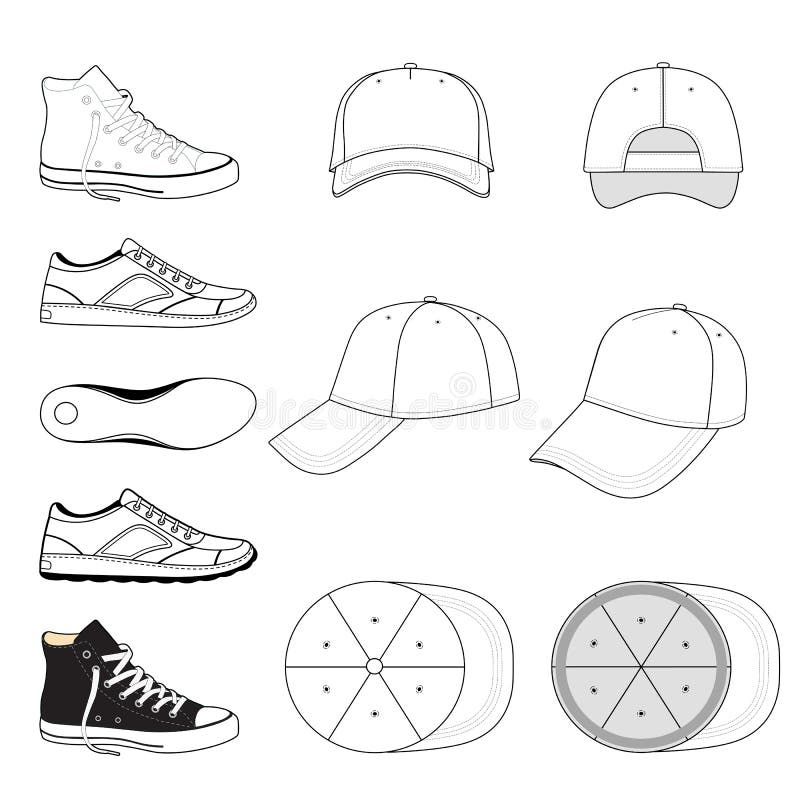
Perspective in baseball cap drawing adds depth and dimension. Start with the front view, as it’s the simplest. Here, the brim appears as a narrow rectangle below the cap’s front panel.
For a side view, the cap’s side panel will be more prominent. Angle the brim down and away, considering the cap’s curvature. The back view is trickier, with the adjustable strap or fitted design becoming the focus.
When drawing a cap from an angled or above view, practice sketching the curve of the brim. It should appear oval and taper into the crown. Imagine it wrapping around the head.
Consistently practicing these perspectives will aid in perfecting your baseball cap drawings. Make rough lines at first and clean them up as you understand the cap’s structure better.
Maintain a light grip on your pencil to make changes easier. Check proportions regularly and adjust where necessary. With time, the accurate portrayal of cap proportions and perspectives will become natural in your baseball cap drawing.
Step-by-Step Guide to Drawing a Baseball Cap from Different Angles
Drawing a baseball cap from various angles can be a simple task with the right approach. Follow this step-by-step guide to create realistic cap drawings from different perspectives.
Front View
First, start by sketching a small horizontal oval for the crown. Add a thin rectangle beneath it for the brim. Make sure the brim’s edges are slightly curved. Sketch the cap’s peak curving away from the oval.
Side View
For the side view, draw an elongated oval for the crown. Position a trapezoid shape for the brim, with the longer edge attached to the bottom of the crown. Indicate the cap’s side panel and the curved edge of the brim.
Back View
Begin with a similar oval for the crown. Add a narrow rectangle for the strap. Details like the buckle or holes should be very simple. Capturing the curve of the back’s strap is key.
Angled View
Draw an oval for the crown tilted to one side. Place an irregular oval shape for the brim, showing the angle. The cap’s side panel should be partially visible. Sketch the brim’s curve connecting to the crown.
Above View
Create a large oval for the crown when drawing from above. Shape the brim as a narrow, curved band around the oval’s base. Add in details such as seams and stitching to complete the look.
Stick to simple shapes at the beginning and gradually add detail. Pay attention to the curve of the brim and the oval shape of the crown. Use your baseball cap drawing keywords as guidance to keep your drawing on track. Cross-check your angles and proportions with reference images. With practice, your drawings will convey the desired perspective effortlessly.

Techniques for Adding Realistic Textures and Fabrics
Achieving realism in baseball cap drawing involves more than getting the shape right. The texture and fabric of the cap can add depth and complete the drawing. Here are techniques to enhance the textures in your art.
Select the Right Tools for Texture
Choose pencils with different hardness levels for varied line qualities. Soft pencils (2B-6B) are great for dark, fuzzy textures. Hard pencils (H-2H) work well for fine, crisp lines like stitching.
Observe Different Fabrics
Study reference images of baseball caps. Notice the canvas weaves or the soft cotton finish. These details are key for realistic textures.
Create Fabric Illusion with Pencils
Use the side of your pencil lead to shade large areas lightly. This technique mimics the even texture of fabrics. For woven details, draw crisscross patterns lightly and build on them gradually.
Applying Pressure for Depth
Heavy pressure creates the appearance of shadows in the cap’s folds. Lighter pressure is used for highlights, suggesting texture variations even in flat areas.
Layering and Blending
Layer light and dark pencil strokes to simulate complex textures. Use blending stumps for smooth transitions. This can suggest a velvety fabric or the sheen on a leather brim.
Emphasize Highlights with a White Gel Pen
Add sharp highlights with a white gel pen to represent reflective areas on satin or polished surfaces. Such details bring your baseball cap drawing to life.
Apply these techniques in moderation to avoid overpowering your drawing. With practice, you’ll enhance the realism of your baseball cap illustrations.
Shading and Highlighting Tips for a 3D Effect
To achieve a three-dimensional look in your baseball cap drawing, shading and highlighting are essential. These techniques can bring your drawing to life, making it pop off the page. Follow these steps to master the art of shading and highlighting.
Shading for Depth and Volume
Start with light shading to establish the basic tones of the cap. Use your softer pencils, like 2B or 4B, for broader, darker areas. Imagine where the light source is coming from. This will guide where to place the darker shades — typically on the opposite side of the light source.
Work in layers, gradually building up to the darkest shades. Use the side of your pencil lead to avoid harsh lines. Focus on the underside of the brim and inside the cap for deeper shadows. This adds volume and a sense of depth to your baseball cap drawing.
Highlighting to Show Reflection and Shape
After shading, use a kneadable eraser to lift off pencil for subtle highlights. Identify where the light hits the cap most directly. This could be on the top of the crown or along the edge of the brim.
For sharper highlights, like the glossy effect on a satin cap, use a white gel pen. Be careful not to overdo it; a few well-placed highlights can make a big difference.
Add a touch of highlight to the stitching. This can make your baseball cap drawing appear more realistic, as stitching often catches the light.
By applying these shading and highlighting tips, your baseball cap drawings will have a rich, 3D effect. It will take some practice, but soon your illustrations will stand out with a lifelike quality that truly captures the essence of the subject.
![]()
Incorporating Baseball Caps into Character Illustrations
When adding baseball caps to character illustrations, it’s essential to consider the character’s style and posture. Here’s how to integrate caps seamlessly into your artwork:
Choose the Right Cap for the Character
Think about the personality of your character. A vintage cap might suit a retro character, while a modern, sleek design fits a trendy individual. Selecting the appropriate baseball cap drawing for your character adds credibility to their persona.
Consider the Character’s Angle and Posture
Keep in mind the position of the character. If they’re looking up, you’ll need to show the underside of the cap. A character looking down will have more of the cap’s top visible. Match the cap’s angle to the character’s head tilt for a natural look.
Adjust Cap Proportions Accordingly
The cap needs to fit the character’s head properly. Resize the cap’s crown and brim to maintain proportion. If the character’s head is larger, adjust the cap’s size so it doesn’t appear too small or too large.
Add Character-Specific Details
Customize the cap with logos, colors, or patterns that relate to the character. Maybe they wear a cap with a sports team’s emblem or a unique color that reflects their personality. Such details can add depth to your baseball cap drawing within the character’s story.
Integrate the Cap’s Shadow and Highlights
Shadows and highlights will connect the cap to the character’s environment. Use the same light source for both the character and the cap. This creates cohesion and makes the cap appear as part of the scene.
By applying these tips, baseball caps can become a defining feature in your character illustrations, enhancing the overall impact of the drawing. Remember to use your keywords when describing baseball cap drawing techniques to stay consistent with your blog’s focus.
Creative Variations: Designing Your Own Baseball Cap Art
Once you’ve mastered the basics of baseball cap drawing, it’s time to unleash your creativity. Designing your own baseball cap art allows for unique expressions and can make your work stand out. Here are some ideas to inspire your creative variations:
Experiment with Different Styles
Try sketching caps from different eras or cultures. Mix retro styles with modern twists, or blend in streetwear elements. Your baseball cap drawings can reflect a wide range of times and tastes.
Explore Color and Patterns
Don’t shy away from bold colors and patterns. Stripes, polka dots, or even abstract designs can turn a simple cap into a statement piece. Play with color combinations to see what pops.
Add Logos and Emblems
Personalize your caps by adding fictional logos or emblems. This gives them character and makes them more than just an accessory. Be creative; invent brands or sports teams that resonate with your artwork’s theme.
Modify the Cap’s Structure
Alter the cap’s traditional structure. Perhaps design one with an unusually shaped brim or a crown with extra panels. This can make your drawing eye-catching and memorable.
Incorporate Environmental Elements
Think about the setting where your cap would be worn. Caps with sun-bleached tones can depict a beach vibe, while caps covered in digital prints might suit a futuristic scene.
Keep pushing your art by trying out these variations. Remember to keep using your baseball cap drawing keywords to stay focused. Each new design you create helps develop your signature style in the world of baseball cap art.
Common Mistakes to Avoid in Cap Drawing
Navigating through the process of baseball cap drawing can sometimes lead to common mistakes. These errors can compromise the overall look and authenticity of your drawing. Avoid these pitfalls to ensure your cap illustrations are as realistic as possible.
Disregarding Proportions
One of the most common errors is ignoring the proportions of the cap. Each part of the cap, from the crown to the brim, should be in correct relative size. Avoid drawing the brim too large or the crown too small.
Overlooking the Cap’s Curvature
A flat look can diminish the realism of your cap. Remember to give the brim a slight curve and show the cap’s roundness on the crown.
Inconsistent Lighting and Shading
Shading without considering the light source can result in an unrealistic look. Make sure shadows and highlights align with one light direction.
Forgetting to Add Texture
Texture gives life to the fabric of the cap; don’t skip it. Use pencil strokes to mimic fabric weaves and create depth.
Overcomplicating Details
Too many details can overwhelm the drawing. Keep it simple. Add only necessary seams, stitches, and logos to suggest complexity.
Misplacing the Cap on Characters
When drawing a cap on a character, ensure it sits naturally on the head. Align it with the character’s forehead and ears correctly.
Not Practicing Different Angles
Draw caps from multiple views to improve. Practice makes perfect, especially with different perspectives.
Incorporating these tips helps to create professional and appealing baseball cap drawings. Keep your work clean, proportionate, and well-shaded, and pay attention to the cap’s interaction with light and texture. Be mindful of these common missteps, and you’ll find your baseball cap drawing skills improving with each attempt. Use your keywords throughout your practice to stay on course and create compelling illustrations.
